Making Topographic Maps with Python
Published:
Making Topographic Maps with Python.
I was inspired by this post to make something similar using Python. Below is the code and data sources that I used to make my own version.
import pandas as pd
import matplotlib.pyplot as plt
import numpy as np
import geopandas as gpd
%matplotlib notebook
GPS Data
Downloaded from Strava
df = pd.read_csv("data/Mount_Blackmore.csv") # my GPS for the hike
df.head()
| Longitude | Latitude | Altitude | Time | Speed | points | |
|---|---|---|---|---|---|---|
| 0 | -110.983176 | 45.489310 | 2035.8 | 0.0 | 0.394188 | (45.48931, -110.983176) |
| 1 | -110.983170 | 45.489338 | 2035.7 | 8.0 | 0.321245 | (45.489338, -110.98317) |
| 2 | -110.983215 | 45.489349 | 2035.9 | 23.0 | 0.196509 | (45.489349, -110.983215) |
| 3 | -110.983223 | 45.489317 | 2036.0 | 48.0 | 0.508822 | (45.489317, -110.983223) |
| 4 | -110.983210 | 45.489287 | 2036.1 | 52.0 | 1.030080 | (45.489287, -110.98321) |
Topographical Data
Data was taken from the USGS:
https://www.sciencebase.gov/catalog/item/5a68b42fe4b06e28e9c70461
I actually need to stitch together two different datasets for this, that’s the first step. These datasets are titled:
- ‘USGS NED 1/3 arc-second Contours for Bozeman E, Montana 20180211 1 X 1 degree Shapefile’
- ‘USGS NED 1/3 arc-second Contours for Bozeman W, Montana 20180211 1 X 1 degree Shapefile’
All the files in the zipped folder you can download for these datasets are necessary. You can’t get away with just downloading the ‘.shp’ file, you need them all.
shapefileW = gpd.read_file("data/ELEV_DATA/ShapeW/Elev_Contour.shp")
shapefileE = gpd.read_file("data/ELEV_DATA/ShapeE/Elev_Contour.shp")
Get the x and y coordinates from the LINESTRING elements in the “geometry” categories
This process can take a while
def get_coords(shapefile_df):
    topo_df = pd.DataFrame(columns = ['x','y','z'])
    for i, row in shapefile_df.iterrows():
        if i<shapefile_df.shape[0]+1:

            try:
                x, y = row.geometry.xy
                x, y= np.asarray(x), np.asarray(y)
                mask = (x>-111.05) & (x<-110.976) & (y>45.43) & (y<45.5)

                x,y = x[mask], y[mask]
                z = row.CONTOURELE

                z = np.ones(shape = len(x))*z


                location_df = pd.DataFrame(data = {'x':x, 'y':y, 'z':z})
                topo_df = topo_df.append(location_df, ignore_index = True)
            except:
                pass
        else:
            break
    return topo_df
# get the data frames and save to .csv files so I don't have to do this step again:

topo_df_E = get_coords(shapefileE)
topo_df_W = get_coords(shapefileW)

topo_df_E.to_csv("data/topo_df_E.csv", index = False)
topo_df_W.to_csv("data/topo_df_W.csv", index = False)
topo_df_full = topo_df_E.append(topo_df_W, ignore_index =True)
topo_df_full = topo_df_full.sample(frac = 0.5) # sub sample the dataframe because its a *lot* of data
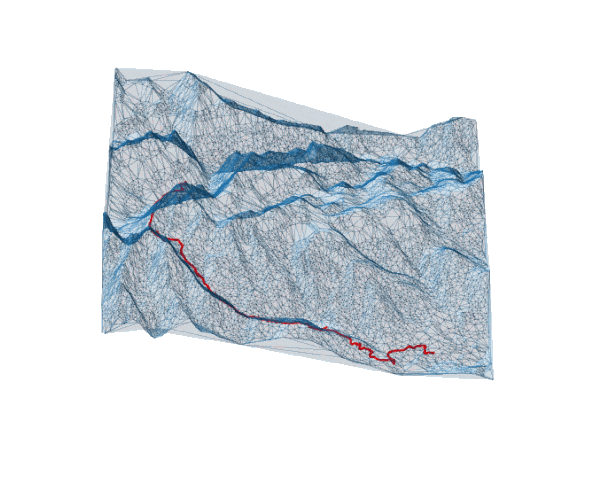
fig = plt.figure(figsize = (10,10))
ax = plt.axes(projection='3d')

ax.plot_trisurf(topo_df_full.x, topo_df_full.y, topo_df_full.z, linewidth=0, antialiased=False,
                edgecolor = None, alpha = 0.2)

ax.plot(df.Longitude, df.Latitude, df.Altitude*3.281, color = 'red') # convert to meters
ax.set_xlim(-111.05, -110.976)
ax.set_ylim(45.43, 45.5)
ax.set_zlim(0, 10000)
plt.axis("off")
ax.view_init(elev=40., azim=80)
Make the movie
This can take quite a while. It produces 360 .png files that I then made into a .gif using this website: https://ezgif.com/maker
You can also make the gif in Python, but I chose not to spend a lot of time on that
fig = plt.figure(figsize = (10,10))
ax = plt.axes(projection='3d')

ax.plot_trisurf(topo_df_full.x, topo_df_full.y, topo_df_full.z, linewidth=0, antialiased=False,
                edgecolor = None, alpha = 0.2)

ax.plot(df.Longitude, df.Latitude, df.Altitude*3.281, color = 'red') # convert to meters
ax.set_xlim(-111.05, -110.976)
ax.set_ylim(45.43, 45.5)
ax.set_zlim(0, 10000)
plt.axis("off")
# rotate the viewing angle and save the png each time:
for ii in range(0,360,1):
    ax.view_init(elev=40., azim=ii)
    plt.savefig(f"img/pngs/movie{ii}.png", bbox_inches = 'tight')
End Result: